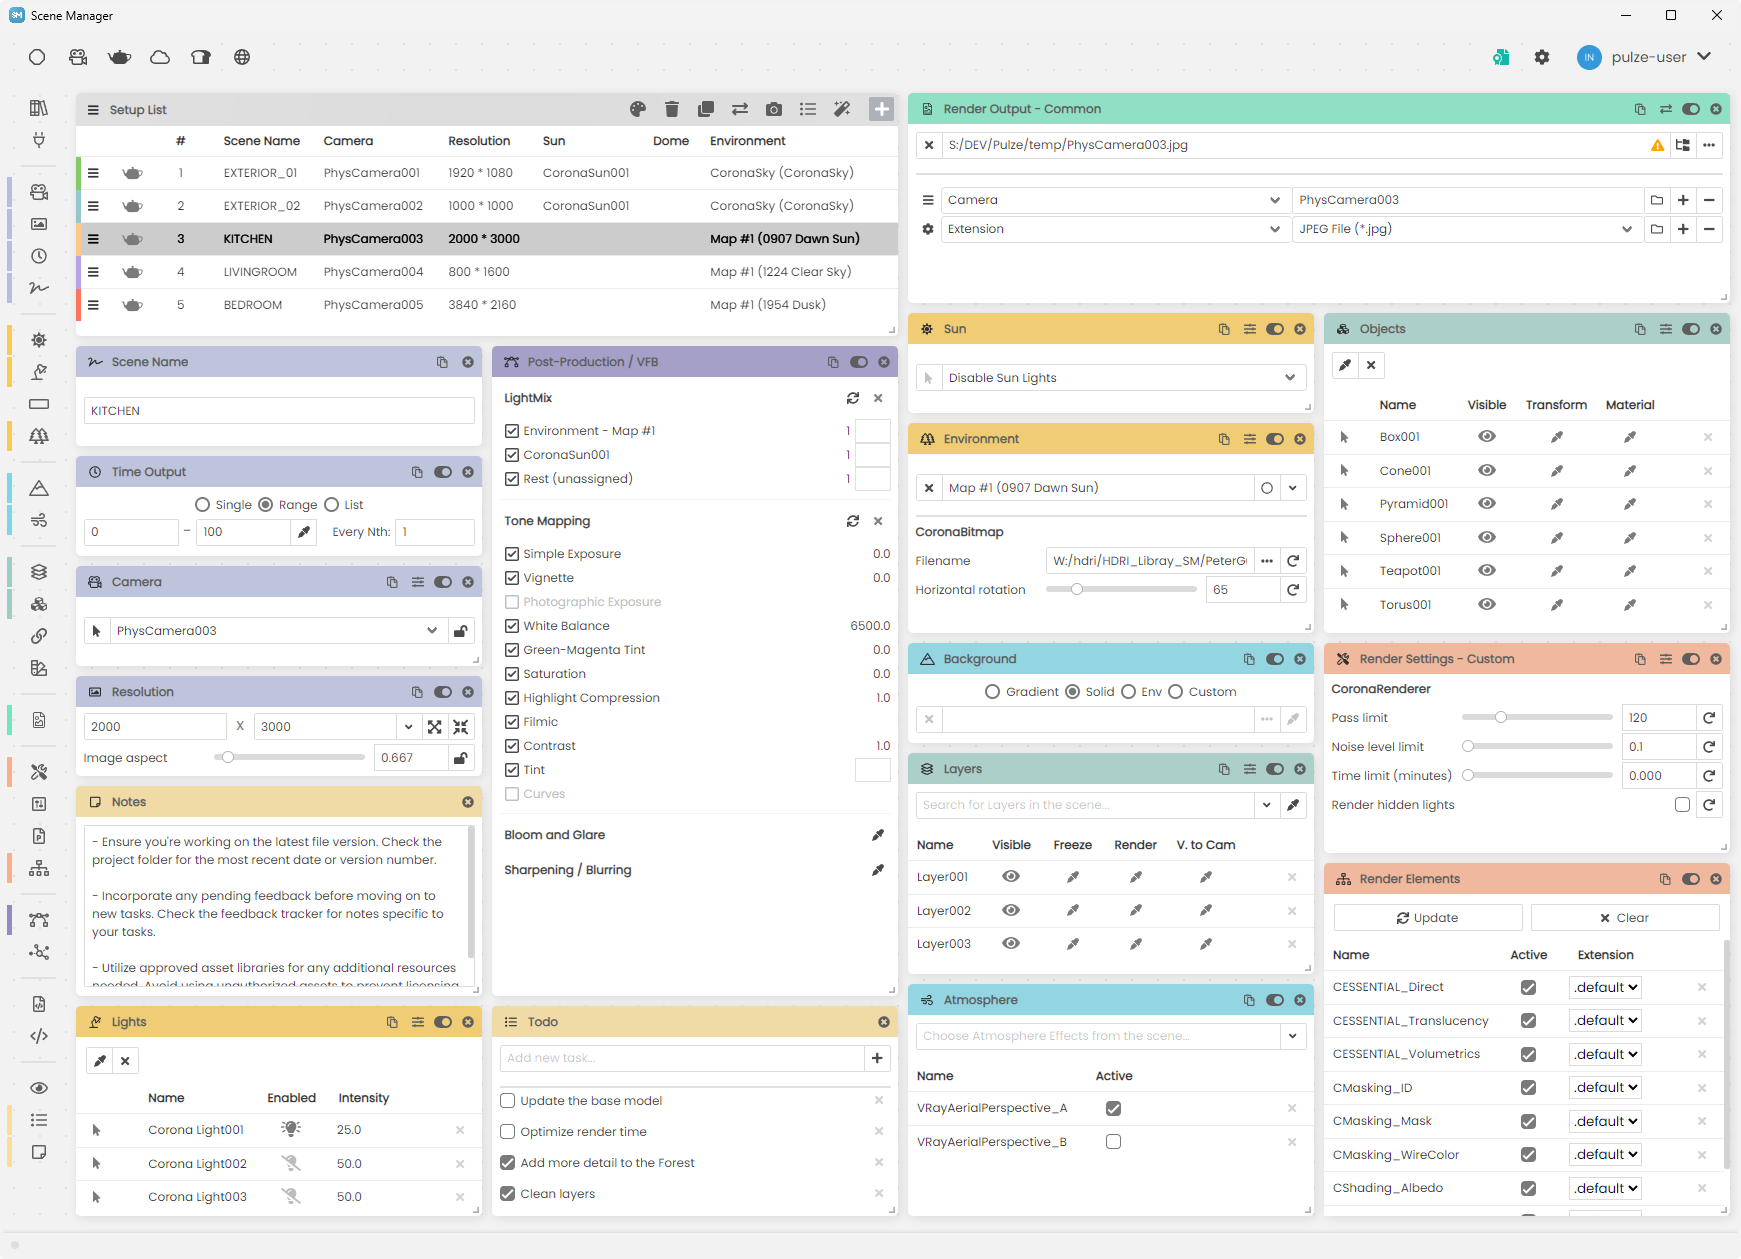
Documentation splash

Getting Started

Prerequisites

  • Scene Manager requires constant internet connection

Supported software

3ds Max 2022 - 2024
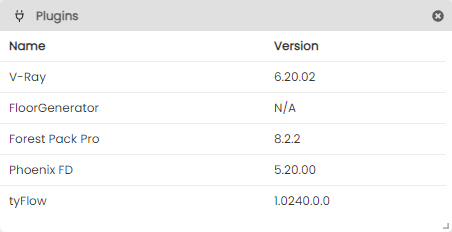
V-Ray 6, Corona, FStorm, Arnold, Redshift
(All other 3rd party and built-in render engines for 3ds Max will also work with limited functionality)


Installation

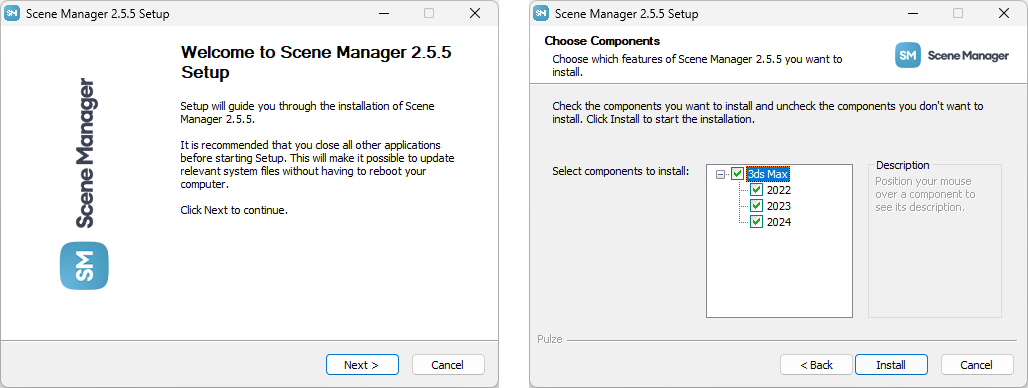
Please close all running 3ds Max instances. Run the downloaded exe and follow the installer’s instructions.

sm_25_installer.png

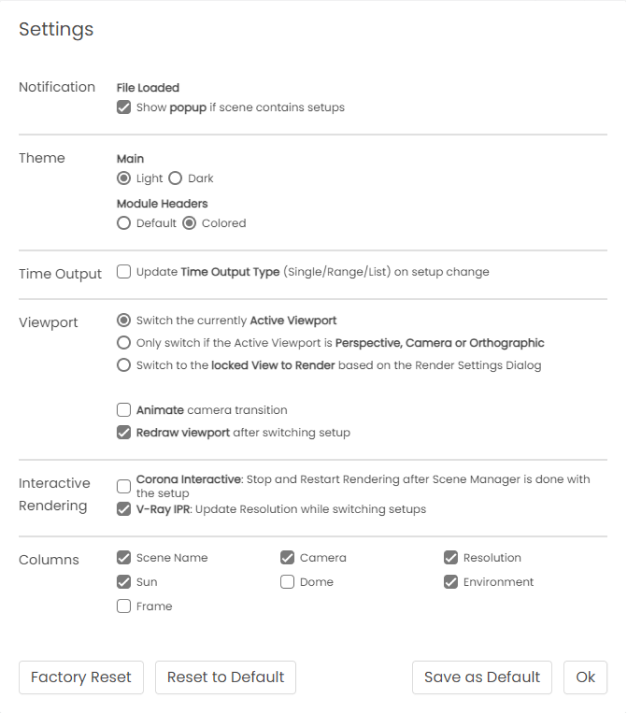
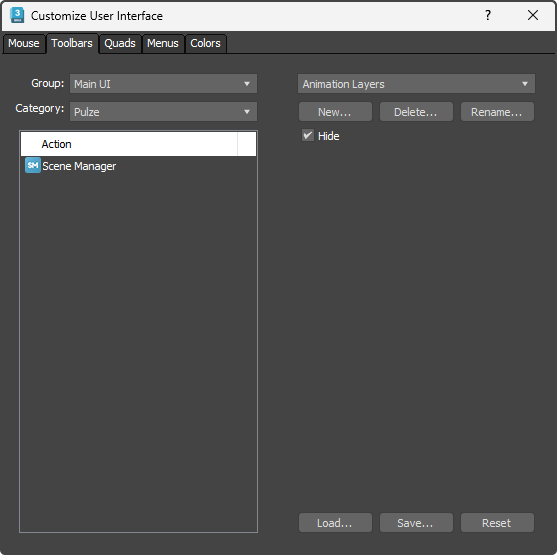
After the installation is done start 3ds Max and go to Customize > Customize User Interface > Toolbars > and choose the Category Pulze to create a toolbar button.

sm_25_max_toolbar.png

The installer also supports silent installation by using the ––silent parameter. This option will install the Scene Manager for all version of 3ds Max that is available on the computer.


Modules

All possible settings are categorized and grouped into modules. You can show/hide and drag around these modules to create the most ideal ui that you need for your current project.

sm_25_modules.png

Setup List

To create an empty state just press the “+” button at the top right corner. Once you click on a state it becomes activated.

sm_25_setup_list.png

Scene Manager will store all its settings in the current max file. Whenever you modify or create a setup it will be stored in the scene. This way if you open the max file on another workstation all the setups will be accessible through the Scene Manager.


Assets

The Assets module allows you to track and collect your scene assets. It simplifies the process of reviewing what you have in your scene. You can sort your assets by category or size, and you also have the option to filter and view only the missing ones.

sm_25_assets.png

In addition to tracking your assets, you can also gather them into a folder or compile them into a zip file.


Plugins

The Plugins module provides a quick overview of the plugins and their versions being used in the scene.

sm_25_plugins.png


Camera

To add cameras to your selected setup, just open up the dropdown where you will see all the cameras from your scene. The selected one will become the viewports active camera. Also you can select or lock/unlock your cameras.

001_camera.png

When you delete or rename a camera or any other object that is used in one of the setups, Scene Manager will track these changes and will make the modification on all setups where needed. Also if Scene Manager is not running, but you have some states stored in your file, it will recognize the changes and will update itself at the next startup.


Resolution

It’s possible to assign different resolutions and aspect ratios to your setups. With the handy aspect ratio slider you can frame your images in an easy and intuitive way. There are also some handy quick buttons which will double or half your width and height values.

002_resolution.png


Time Output

The Time Output module is responsible for the current slider time and timeline range as well as the Render Settings > Time Output properties. You can define a Single, Range and a List of frames which are both helpful in case of stills and animations.

007_time_output.png

If your active camera is animated you can fetch the first and last key which will define the start and the end value of the range as well as the timeline.


Scene Name

After a certain complexity PhysCamera001, PhysCamera002 doesn’t mean a lot then with the Scene Name module you can add a more defined name for your scene setup.

015_scene_name.png


Sun

If you select a Sun from the dropdown it will be turned on automatically and the rest of the main light sources in the scene will be turned off. In most cases you will also want to have a sky in the environment linked to the sun. To do this you only need to press the cloud button and it will create a sky material according to type of the sun (VRay or Corona), link them together if needed and add it to the environment slot.

003_sun.png


Dome

There are a couple of ways that you can think about using Domes and HDRI-s with the Scene Manager. You can create a Dome for each setup, or you can reuse one Dome across multiple setups. It is up to you which workflow suits you the more. By opening the dropdown you can select a Dome light from your scene. You can select it, show the chosen HDRI in your preferred Material Editor, or you have the option to fetch the hdri if the dome already has one.

004_dome.png


Hdri Browser

The Hdri Browser will let you access your favorite folders and quickly test out various lighting conditions.

028_hdri_quick_browser.png


Environment

The Environment card will control 3ds Max Environment Settings. By default it set to None. If you have a valid Sun object you can choose to have a Sky map, if you have an HDRI loaded you can load it into the environment from here, or if you need more specific control you can choose Custom.

006_environment.png


Background

This module controls your active viewports background, you can choose between Gradient, Solid, Environment and Custom. Where the custom option will let you browse a background image, which can be handy in case you want to do photo matching for multiple cameras.

008_background.png


Atmosphere

With the Atmosphere module you can take control over 3ds Max Atmosphere Effects, like VRayAerialPerspective or VRayEnvironmentFog. After choosing the required ones from the dropdown you can take control over them and enable/disable these effects per setup.

020_atmosphere.png


Layers

For each setup you can add multiple layers from your scene and control their visibility. There are multiple ways to add your layers, you can search or select them from the dropdown, or by selecting the layers in max you can load them in by pressing the fetch button.

014_layers.png


Objects

With the Objects module you can add your selected geometry from max and control the visibility per setup. It’s an alternative to the Layers Module that does almost the same but there are cases when the usage of this is much easier.

sm_25_objects.png

It is not recommended to add more than 10-20 objects to this module. If you would like to control a bigger portion of the scene use the Layers Module.


Xref Scene

The Xref Scene module will let you select files that are loaded into your scene. You can enable/disable and set the visibility of these files per setup.

016_xref_scene.png


Variants

You can define a list of layers where each item will represent a version of a product. This way you can easily create and render hundreds of variations within one state. Perfect solution if you are doing product renderings.

030_variants.png


Render Output

You can choose between multiple output modules depending on your render engine. By default you will always have the Render Output - Common which is mapped to the Render Setting > Common Tab > Render Output. In case of V-Ray you are able to use Render Output - Channels (V-Ray Separate Render Channels) and the Render Output - Raw module (V-Ray Raw Output).

009_render_output_common.png

For every camera or setup you can create outputs with different filenames and extensions by defining a project folder and adding in rules. If the generated path does not exist, the Scene Manager will create it at render time. It’s also possible to change the global format settings for jpg, png, tif, tga and exr extensions.


Render Settings

Pick from an initial set of the most important render settings for V-Ray, Corona and F-Storm and modify them per setup.
025_render_settings_custom.png

The Render Settings - Override module can take control over your Render Settings and modify almost every property per setup. Once enabled you have to define a default render preset by pressing the Fetch button. After that you can start modifying your settings in the Render Setting Dialog and by pressing Fetch you can “lock” down these changes per setup. You can see how many and which properties are changed.

As an example in case of V-Ray this module can be used to fine tune all kinds of performance/quality settings per setup. In Corona you could control all the post processing and bloom and glare properties per camera, and these settings will be also shown in the Corona VFB.
019_render_settings_override.png

You can load 3ds Max Render Preset files (*.rps) for each setup. When switching between the setups, Scene Manager will first apply the render settings that you loaded, and after that it will overwrite it with all the other active settings that you have in each module (Resolution, Render Output, Environment, etc…).
018_render_settings_preset.png


Render Elements

The Render Elements module will let you enable/disable the required elements per setup. As an example you can set multiple ZDepth passes with different max values for each camera, or you can control which Light Select pass to include in your final render to keep your final exr, cxr or vrimg file smaller.

021_render_elements.png


Post-Production

The Post-Production module will allow you to control your V-Ray VFB Layers or the new Tone Mapping settings for Corona 8. Change the Tone Mapping or VFB Layers settings as you wish then press the fetch button. This will save the current state and whenever you activate the state again, Scene Manager will apply the VFB settings.
By pressing clear, Scene Manager will forget the settings and it will no longer apply the settings.

029_post-production.png


Render Manager

You can set a couple of basic settings that the Render Manager will recognize during submission, such as Image or Animation job type.

100_pulze_render_manager.png


Script File

With the Script - File module you can set a Pre-Render and a Post-Render script for each of the setups. This can come handy if you would like to do extra things before and after the render process.

017_script_file.png


Script Editor

As an alternative to the Script - File module, the Editor provides an option for TD-s and Developers to extend the core functionality of the Scene Manager. You can just paste in your code or write it directly in the module. It has all the functionalities as a Code Editor should have, basic maxscript syntax, autocomptition with V-Ray, Corona and FStorm render settings included.

There are 4 tabs where you can place code:

  • Pre-Setup - Runs before setting the properties (Camera, Resolution, Lights, Output, etc.)
  • Post-Setup - Runs after all other properties has been set (Camera, Resolution, Lights, Output, etc.) but before the Pre-Render
  • Pre-Render - Executed before the render starts
  • Post-Render - Executed after the render finished

By pressing the Test button you can evaluate your code and get back errors if there are any.

022_script_editor.png


Thumbnail

You can save a preview of the viewport or VFB per setup, and use it as a thumbnail for your scene settings. This will help you visualize and review your setups without having to start a render.

sm_25_thumbs.png


Todo

Todo list can come handy if you would like to manage your tasks inside Scene Manager.

013_todo.png


Notes

You can leave notes for yourself or others that you are working with.

012_notes.png


Bake Setups

This feature will let you bake and convert your scene manager settings to 3ds Max’s native scene states and render presets. After that it will also add it to the Batch Render List so you will able to submit your setups to Backburner or any other 3rd party render service.

scnmgr_bake_setups.png

You also have the option to batch save each Scene Manager state to 3ds Max, V-Ray Scene or Corona Scene files.

Settings

Notifications

If enabled a message box will appear during file load if the scene contains Scene Manager settings.

Theme

Choose between the Light and the Dark Theme.

Viewport

You can choose between 3 different viewport switch options. These viewport settings will only affect the camera and the viewport background, the rest of the modules for example, sun, dome and environment will be applied.

  • By default Scene Manager will switch the currently Active Viewport
  • Only Active Perspective, Camera, Orthographic will just switch these types of viewports
  • View to Render will switch to the locked viewport that is set in the Render Setup Dialog and then back to the previous viewport where you are working in

Redraw viewport after switching setup will refresh the viewport to ensure that everything is up to date.

Interactive

In case of Corona Interactive if this option is enabled the Interactive Rendering will stop and restart automatically to ensure stability.

Columns

Show/Hide columns for the Setup List module

sm_25_settings.png