
As your projects grow and the more assets and plugins you use in 3ds Max, there is a high chance of something going wrong. These tips will help you stay away from problems, but if you are already in trouble I’ll show you how to get out of it.
1. Keep your project and assets on the network
Whenever you want to render something on your network, all the involved computers should be able to access all the textures, proxies, etc. that are used in your scene.

If your assets are in one place everything should work fine
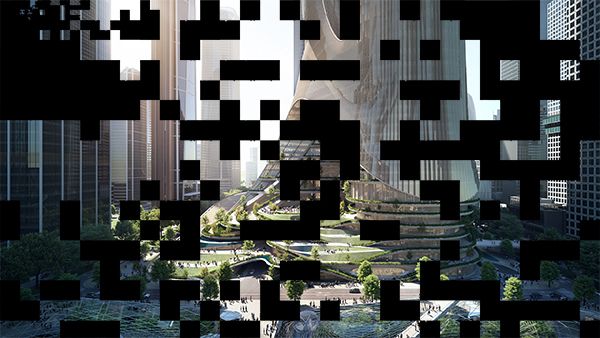
Possible outcome of a distributed rendering if your assets are not accessible from the network
In the heat of a project it can easily happen that assets are added outside of the given network location. Let’s say you download and merge some models from your C:\ drive. If you would like to render your scene with the help of multiple computers you should collect all your textures and move them to your network drive.
3ds Max comes with an Asset Tracker (you can access it from File > Reference > Asset Tracking) where you can view all the used references in your file. The list of assets will refresh after you save the file, but make sure you manually refresh from time to time just to make sure you everything is up to date.
![]()
The Asset Tracking will give you great insight on what assets you are using and what their current state and location is
Besides the built-in asset tracker there are two easy to use scripts that will help you to deal with these problems. To find and relink your missing textures you can use the Relink Bitmaps script. If you would like to collect and move all your assets to another location the Collect Asset script will be a huge help.
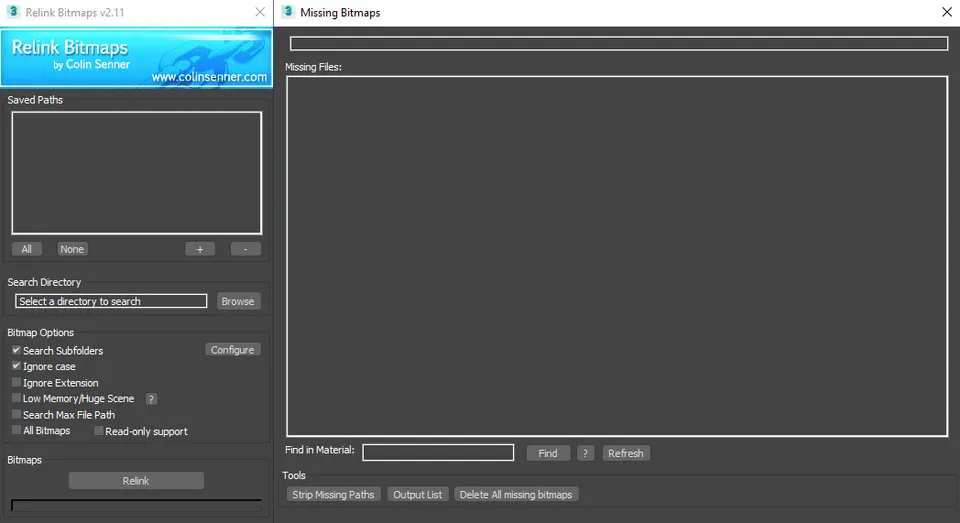
Relink Bitmaps will help you to find and restore your missing textures
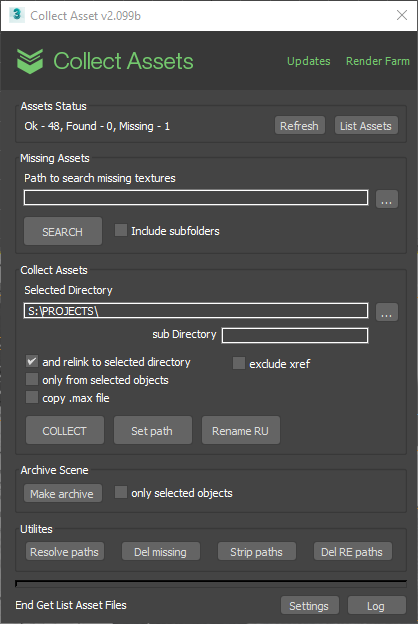
Collect Asset will copy and relink all your assets to the selected directory
2. Check your scene frequently
Depending on the complexity and size of your project, there can be many things that can go wrong. Before starting your render you should make sure that your scene is clean and has no errors.
Tools like Sini Forensic will help you to dig deeper and search for material, geometry, compatibility and all sorts of issues that could lead to unsuccessful renders. Make sure to run these frequently to eliminate the issues as soon as possible.
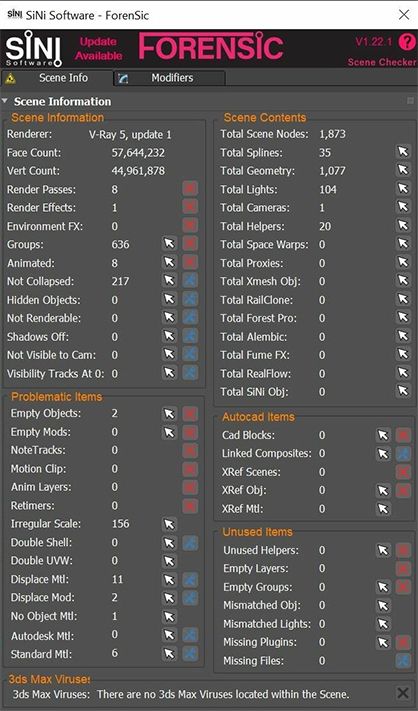
Sini Forensic is a great tool to debug and fix your scene
3. Measure and optimize your RAM usage
RAM usage is a crucial factor when it comes to network rendering, especially if you have computers with less RAM than your primary workstation. There are a couple of ways to figure out how much RAM your scene will use:
The easiest way is to search for 3ds Max in the Task Manager and check the memory column.
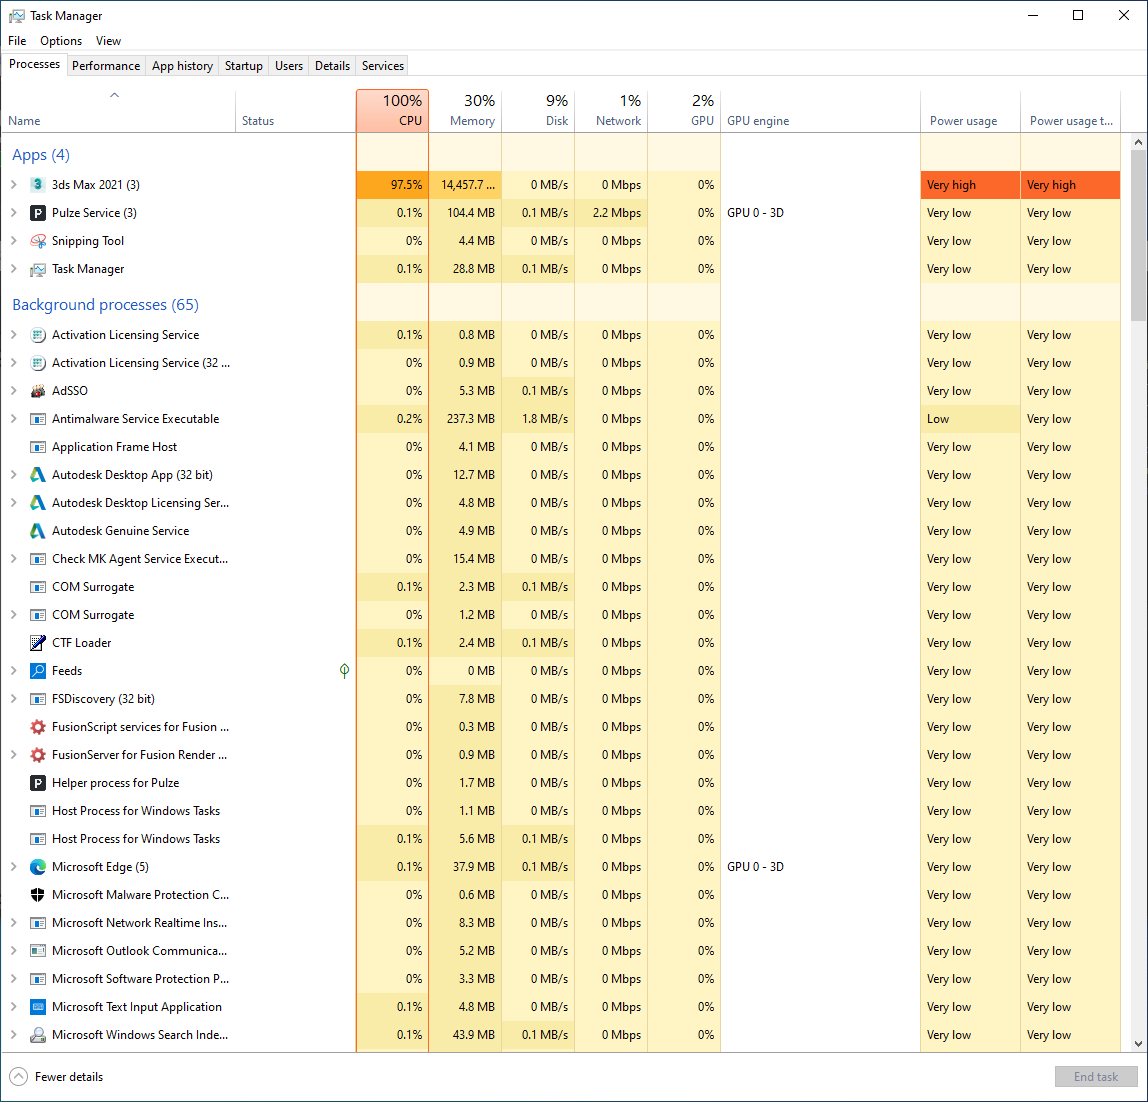
Task Manager while 3dsMax is rendering
If you would like to dig deeper and check the consumption per asset you can do that with V-Ray by turning on the Memory tracking under Settings > System and start rendering.
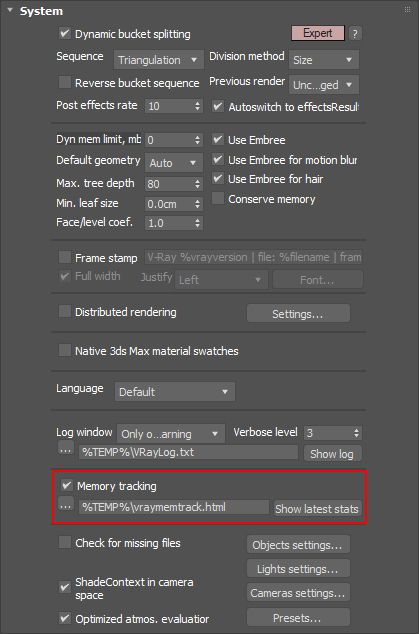
Wait a few passes, stop your render and press “Show latest stats”. A sheet like the following should pop up in your browser where you can see the detailed memory consumption of your scene.
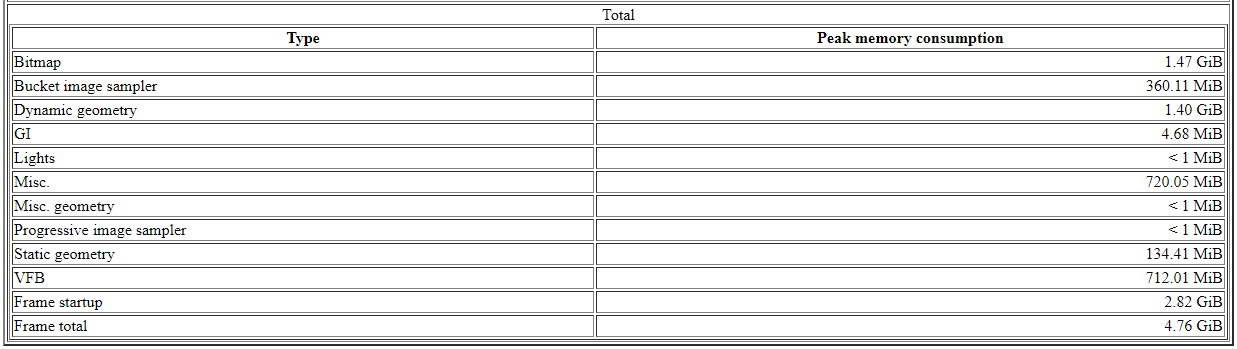
Memory stats showing the total consumption per type
If you see anything that is using way too much RAM, for example an 8K texture on a tiny background element, you might want to change that to a lower resolution.
You can do that by opening your texture in Photoshop and changing the image size, or you can use a handy tool like Bitmap Tracking / Resizing by Pixamoon which will resize your selected textures with a click.
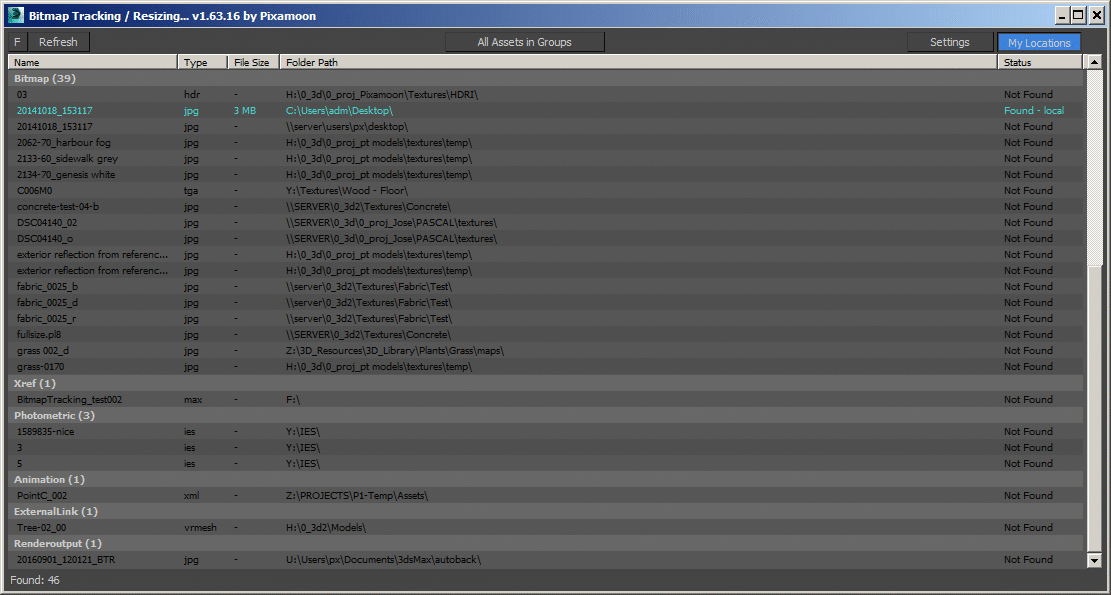
The Bitmap Tracking / Resizing script by Pixamoon
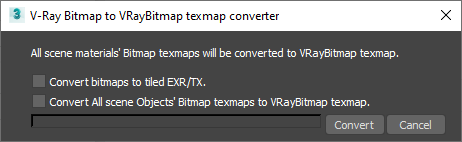
The script is also capable of converting your textures to the tx file format. If you are not familiar with this format you can read more about it here. Essentially this special format will dramatically improve the load time, overall render time, and it allows using a smaller texture cache. Currently tx is supported in V-Ray and Arnold Renderer. In case of V-Ray you can convert your bitmaps texture to tx format, by right clicking on the viewport and clicking on the V-Ray Bitmap to VRayBitmap texmap converter.
4. Keep track of your plugins
3ds Max is well-known for the awesome 3rd party plugins like Forest, RailClone, tyFlow, Multitexture, etc. You can easily end up using half a dozen of these plugins in your project, and they will make your workflow so much easier.
From time to time the plugin developers will come out with updates and new versions. It’s really important to have the same version of 3ds Max, render engine and plugins across all the workstation and render nodes. Having missing plugins or version differences could lead to all sorts of problems.
Depending on how many computers you have and how many plugins you are using, it can be time consuming to keep everything aligned and up-to-date.
Luckily for the plugins where you only need to copy a few files to the 3ds Max plugins folder there is an easy solution to this problem.
Collect and copy these plugins to a network location like S:\plugins\Max2021
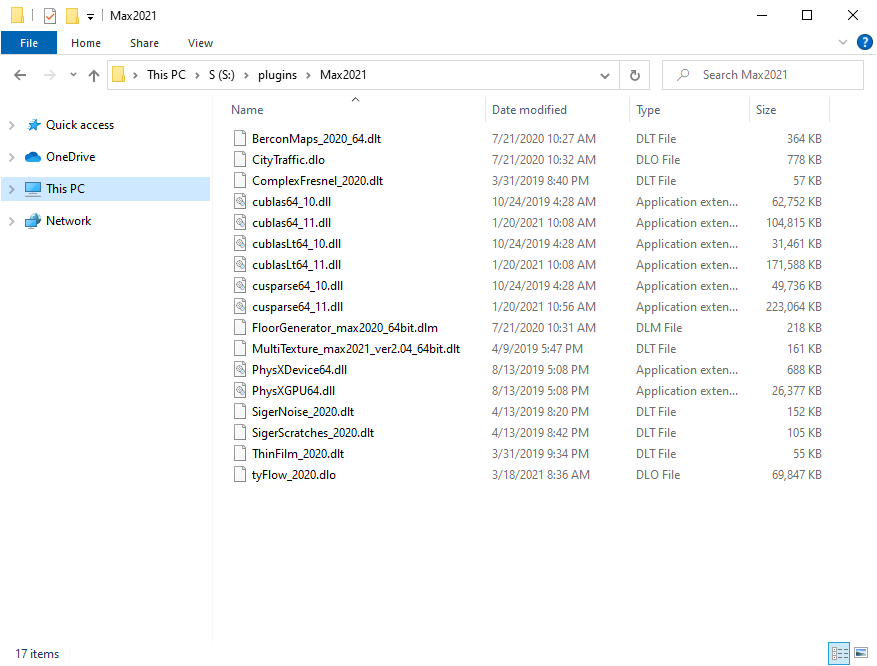
Network folder with your favorite plugins
After that on each computer open the Plugin.UserSettings.ini (located at C:\Users<username>\AppData\Local\Autodesk\3dsMax\2021 - 64bit\ENU) and add the location to your plugins. Next time you need to update or add a new plugin you just need to add it to the network directory.
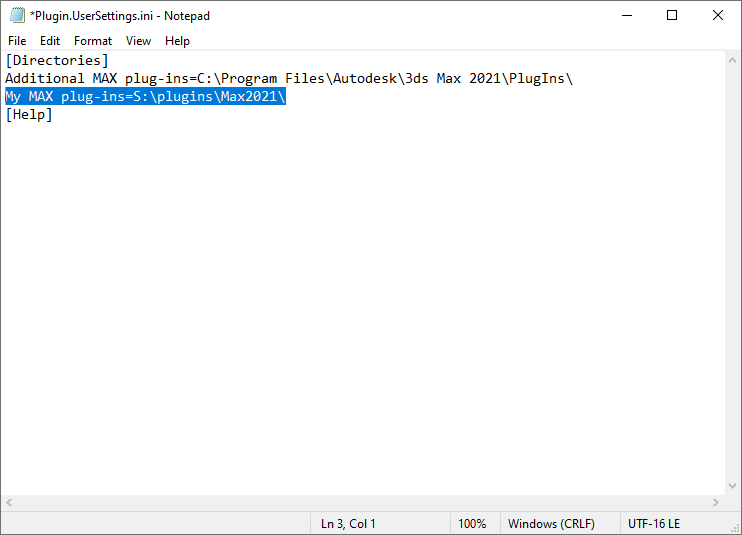
The Plugin.UserSettings.ini file with the new custom directory pointing to your network folder
5. Listen to the logs
You might think that render logs are only for developers. Well that is not true as there is plenty of useful information in there that will help you when you are facing problems.
There are many cases when V-Ray or Corona will warn you during the rendering about material problems, missing textures, invalid geometry or other issues. Don’t ignore them, because these can be the cause of slow and unsuccessful renders.
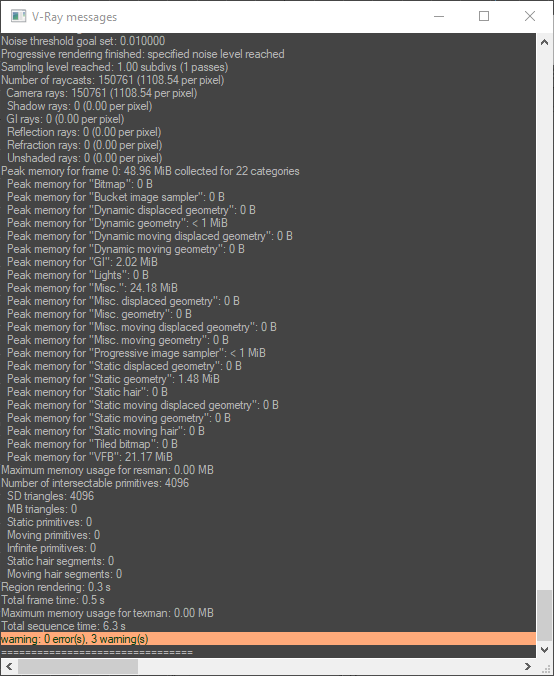
V-Ray messages window showing 3 warnings
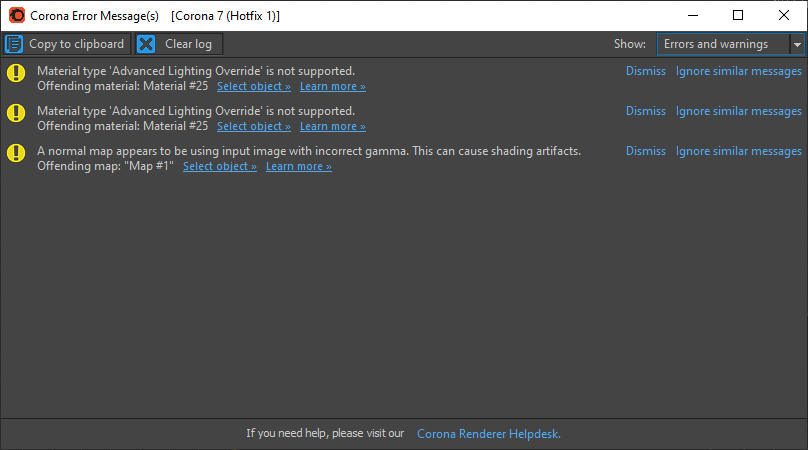
Corona error messages window showing not supported materials and offending maps with the option to select or learn more about the problem
If the messages are not helpful enough and you can’t figure out what to do, you should check the chaos forums (V-Ray) or look at the corona support page (Corona Renderer).
There can be cases when the problem comes from another plugin or max itself. It’s a good practice to check the log of 3ds Max as well. In case of 3ds Max 2022 you can find this file at:
C:\Users<username>\AppData\Local\Autodesk\3dsMax\2022 - 64bit\ENU\Network
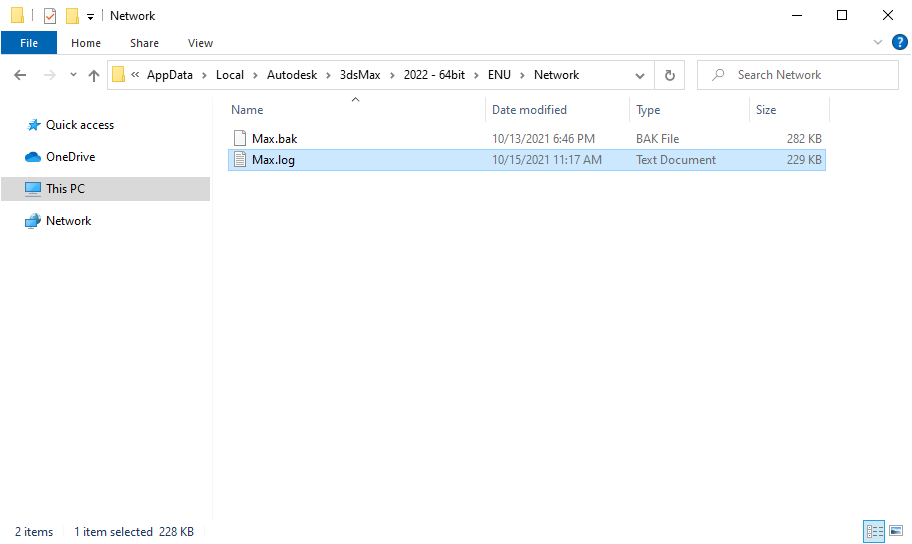
Your 3ds Max log is located inside the ENU\Network folder
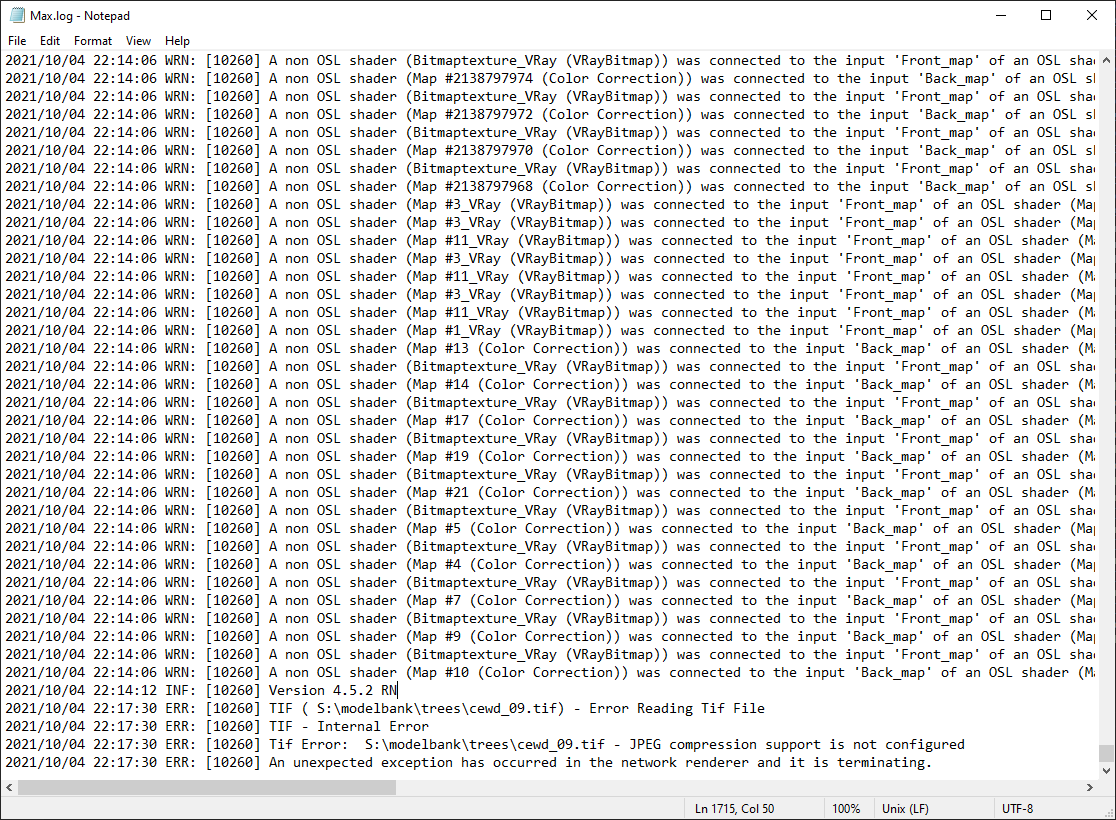
The Max.log file showing some errors and an unexpected exception (crash) at the bottom
As an example, let’s say you are experiencing mysterious crashes when starting your render and you have no idea what goes wrong. This is the perfect time to open up the Max.log and try to figure out what’s wrong. By going to the last line you can read “An unexpected exception has occurred” which means that 3ds Max crashed. If you read a few lines above you will notice that there is some kind of TIF error. Error Reading Tif File, Internal Error, JPEG compression support is not configured, these doesn’t look good.
This is plenty of information which will help you to solve the crash. By googling any of these error messages you will find out that you need to open the problematic TIF file with Photoshop and save it again with different compression settings. Once you try to render it again it should be all good!
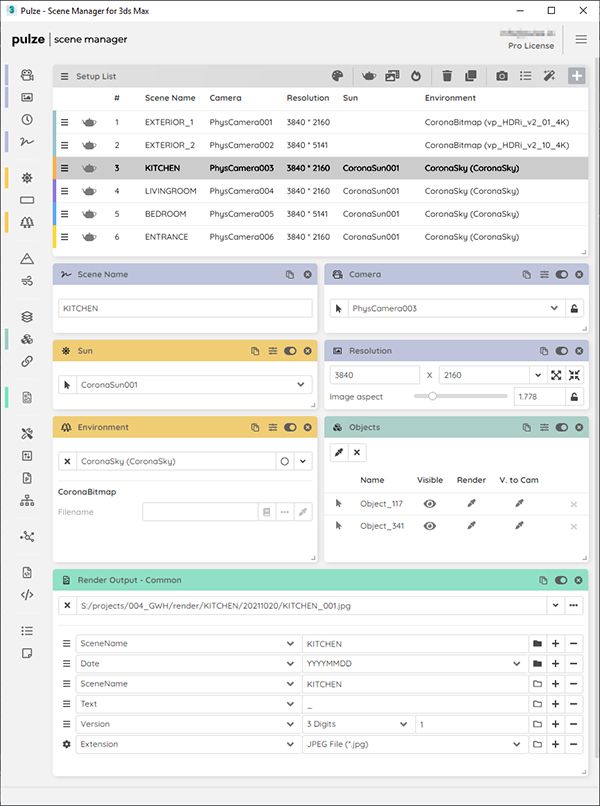
+1 Use a combination of Pulze Scene and Render Manager
With Scene Manager you can save various resolutions, lighting conditions, layer and object states as well as different outputs, render elements, render settings and many more per camera.
This intuitive tool will take the trouble off your shoulders so you don’t have to remember and manually set all the combinations, and when it comes to rendering you can be sure that everything is in place.
Render Manager will help you even further. The extensive sanity check before the job submission will warn you for problems such as
- Missing assets
- Not enabled render output
- Turned off render elements
- Enabled region render
- Foreign characters in object name
and many more.
You could also set the importance of each check. If you have a Critical error you will have to fix the problem before submitting your job.
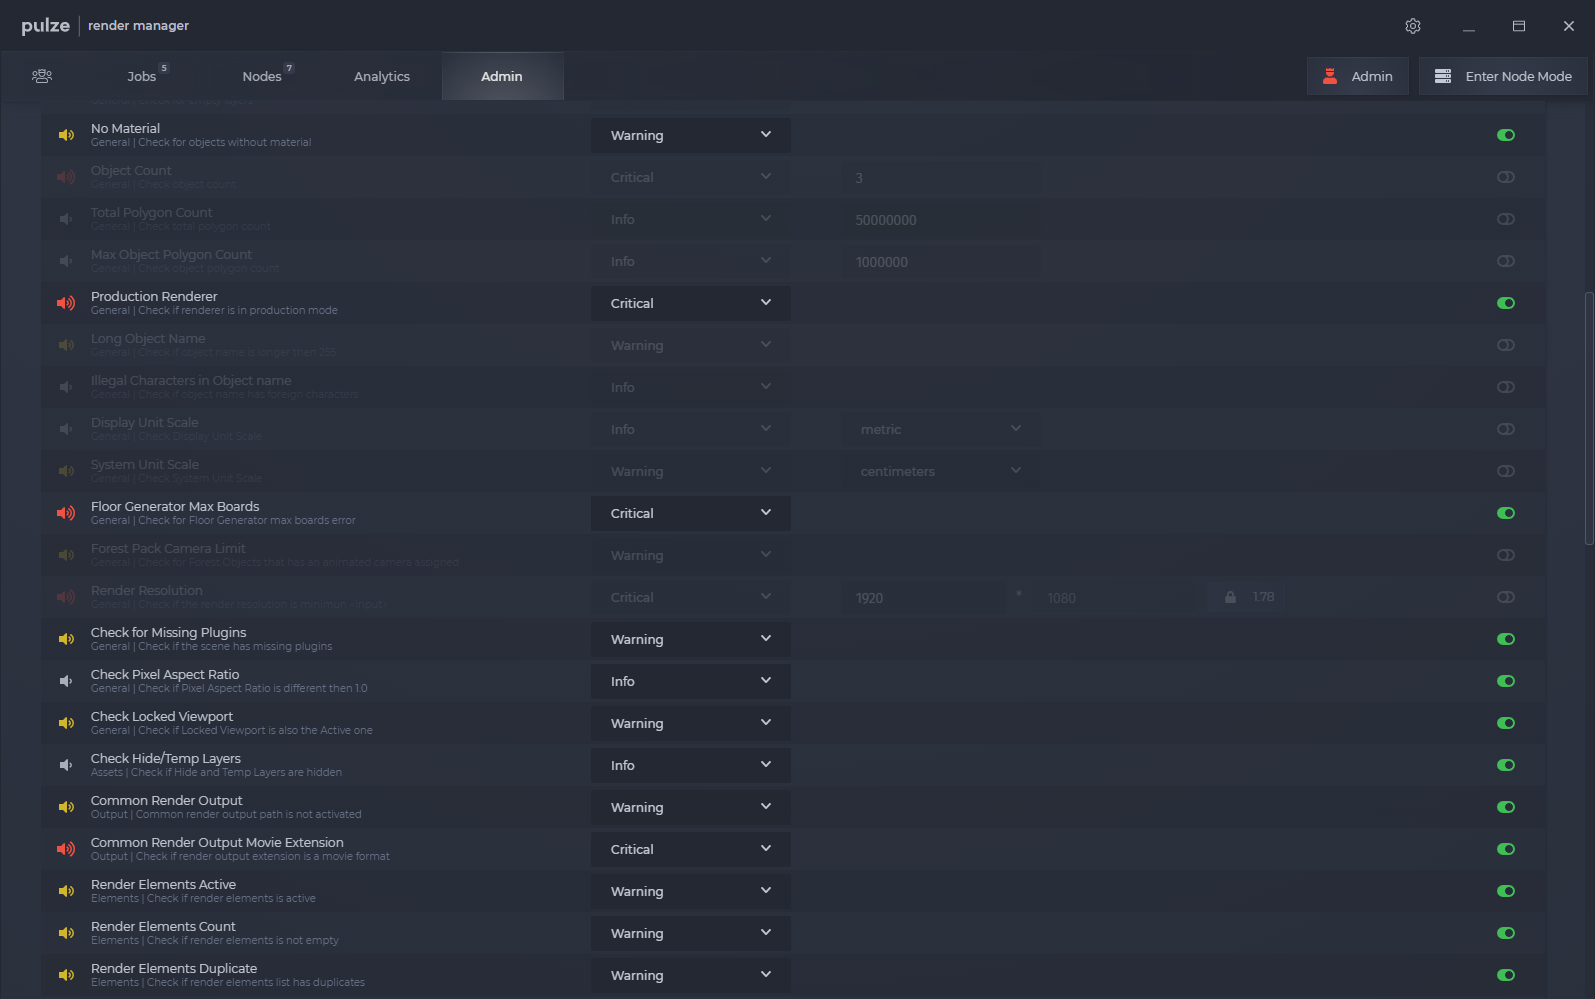
List of sanity checks in Render Manager
Render Manager will also check your scene for 3rd party plugins, and will add them automatically to the list of job requirements. You will be warned if a computer has missing or have a wrong version of a plugin - in this case it won’t be allowed to work on the job.
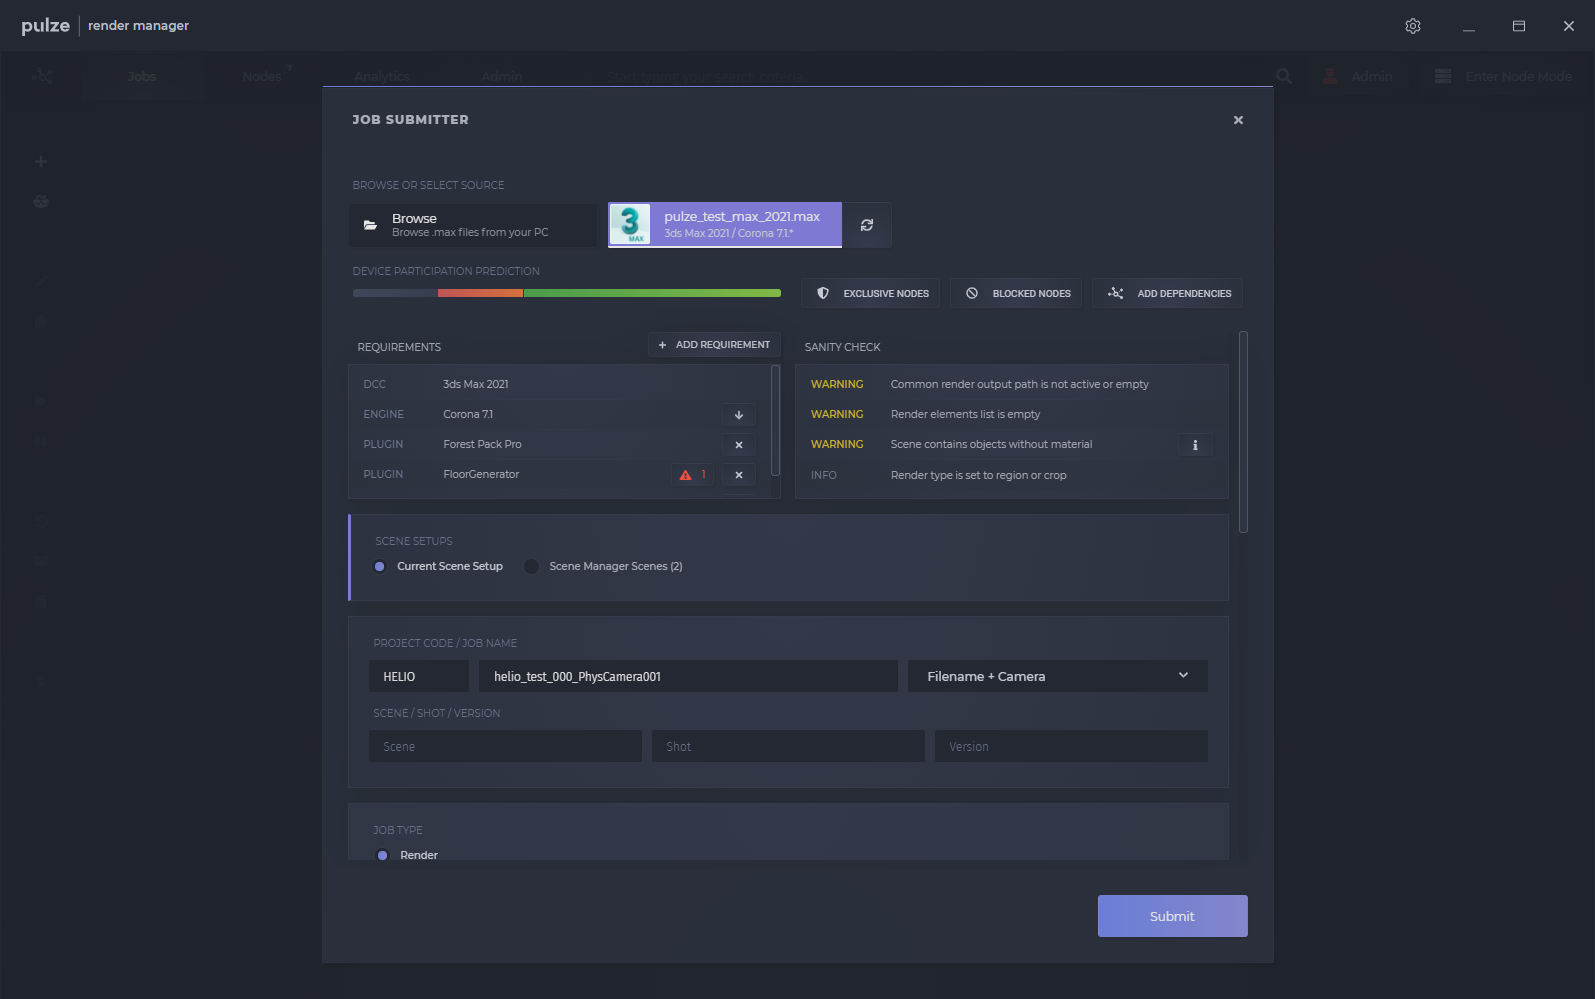
The job submission options in Render Manager
While working on a job, Render Manager will constantly read and check the logs from 3ds Max, V-Ray/Corona and it will show you all the relevant warnings and errors with some additional help.
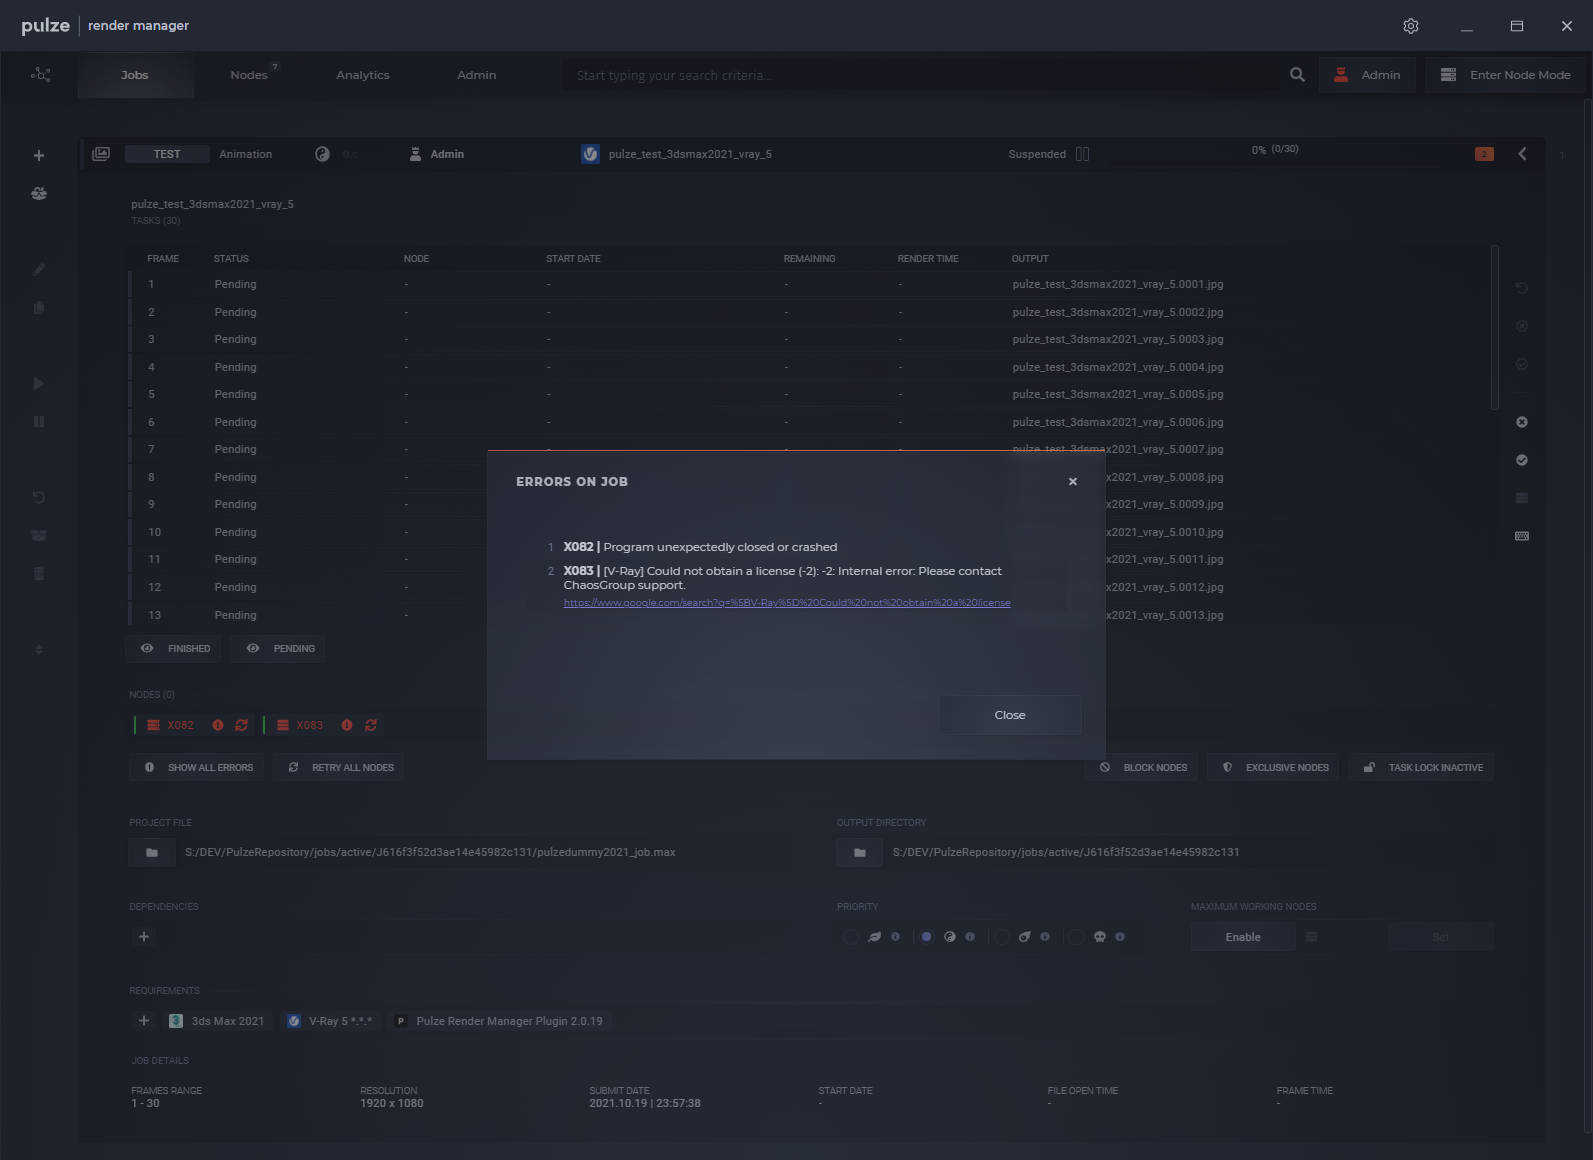
List of errors with additional link that will help you to solve the problem
I hope that these tips will help you to avoid/solve your problems and make your network rendering experience smoother. If you would like to suggest some topics for future articles please get in touch with us at info@pulze.io!
Happy Rendering!